Showing posts with label crock pot. Show all posts

Saturday, May 11, 2013

Easy 3 Bean Crockpot Chili


My crockpot chili is super fast and easy because I don't pre-brown the meat.  I use ground sirloin so there's no extra fat to cook off and drain.  I can get this started in 15 minutes and be on my way.
Everything gets stirred together in the crockpot, cover on, set to Low and off I go.
 
 
Stirring the crushed tomatoes and tomato paste into the raw meat will allow the meat to cook without forming large clumps.  I love how forgiving this recipe is - sometimes I add some diced jalapeno instead of, or in addition to, the sweet pepper, sometimes I leave out the diced tomatoes or use ground turkey instead of beef.  Prefer a vegetarian chili? Leave out the meat altogether. 
 
 
After everything is combined, sprinkle the cocoa powder over the top. Once your cooker heats up, the cocoa powder will melt. You can stir it in anytime after it melts. If you try to stir it in when it's still dry, it will clump. Let it cook at least 30 minutes longer after stirring in the melted cocoa powder to allow flavors to blend. You will not taste cocoa, you will taste rich silkyness.
 
Notice how stiff the mixture looks.  It will thin out a bit once it cooks, but this is a thick chili.  If it's too thick for your taste, you can add additional broth after it's finished cooking. 
 
Easy 3 Bean Crockpot Chili
1 lb. ground sirloin
1 (14-16 oz.) can crushed tomatoes or tomato sauce
1 (6 oz.) can tomato paste
2 tablespoons dried chopped onion
1 tablespoon paprika
2 - 3 tablespoons chili powder
1 teaspoon cumin
1 teaspoon minced garlic OR 1/4 teaspoon dried
1/2 teaspoon ground black pepper
2 (14-16 oz.) cans chili beans
2 (14-16 oz.) cans beans, drained and rinsed (black, pinto, red, great northern)
1 (14-16 oz.) can diced tomatoes, undrained
1/2 of a sweet bell pepper, diced (any color)
1/2 cup beef broth or water
 
2-3 teaspoons unsweetened cocoa powder
 
Spray interior of crockpot with non-stick.
Add ground beef, crushed tomatoes, tomato paste and spices.  Stir until smooth.
Add beans, tomatoes, bell pepper and broth; stir gently to combine.
Sprinkle cocoa powder evenly over top.
Put lid on, turn on Low and cook 5 - 8 hours.  It gets better the longer it cooks. 


Tuesday, September 18, 2012

Gluten-Free Crockpot Stuffed Peppers

This past month has been a hodge-podge of last minute meals.  Time to get back to menu planning.  I like to plan menus around what's growing in the garden, sales and coupons.  I also plan to use up leftovers and knowing what's for dinner avoids that last minute scramble to get something, anything on the table.

This Week's Menus

  • Swedish Meatballs (Ikea), boiled potatoes, cinnamon honey carrots
  • Pork Loin Roast, baked sweet potatoes, corn
  • Stuffed Peppers in the Crockpot, mashed potatoes
  • Crockpot Greek Lemon Chicken, rice, home canned green beans
  • Pulled Pork sandwiches from leftover pork roast, cole slaw, 3 bean salad

I got the pork loin roast on a buy-one-get-one-free sale and the ground sirloin was free with a coupon when I bought both hamburger buns and beans.  LOVE those kind of deals!

Stuffed Peppers in the Crockpot with OAMC* option
Serves 4 - 8

4 bell peppers
1 lb. ground sirloin
1 cup cold cooked rice
3 tablespoons dried minced onion (or 1 cup very finely minced fresh onion)
2 garlic cloves, grated on the microplane
1 tablespoon Italian seasoning
1 egg, beaten
2 tablespoons gluten-free quick oats
1/2 teaspoon salt
1/4 teaspoon pepper
1 (26 oz.) jar traditional style pasta sauce (not marinara - it will get watery)

Spray interior of crockpot with non-stick.  Reserve 1/2 cup of pasta sauce and pour remaining sauce into crockpot.

Cut tops off peppers.  Discard stems, keep tops and mince.  Discard seeds.  Check to see if pepper will stand upright.  If it won't, trim the base without cutting through to center, so it will stand upright.

In a large bowl, combine beef, cooked rice, pepper tops, onion, garlic, Italian seasoning, egg, breadcrumbs, salt, pepper and 1/2 cup of the pasta sauce.  Mix well.

Fill each pepper with meat mixture, pressing firmly, mounding it on top. *Prepare to this point for OAMC; tightly wrap individually in plastic, place in ziptop bag and freeze.  Unwrap frozen and thaw upright before proceeding.

Place peppers into crockpot.  Spoon some of the sauce onto each.

Cook on Low 6 - 8 hours or on High 4 - 6 hours.  Test temperature for doneness at minimum time.

Leftovers reheat well in microwave.

*Once A Month Cooking


Sunday, August 19, 2012

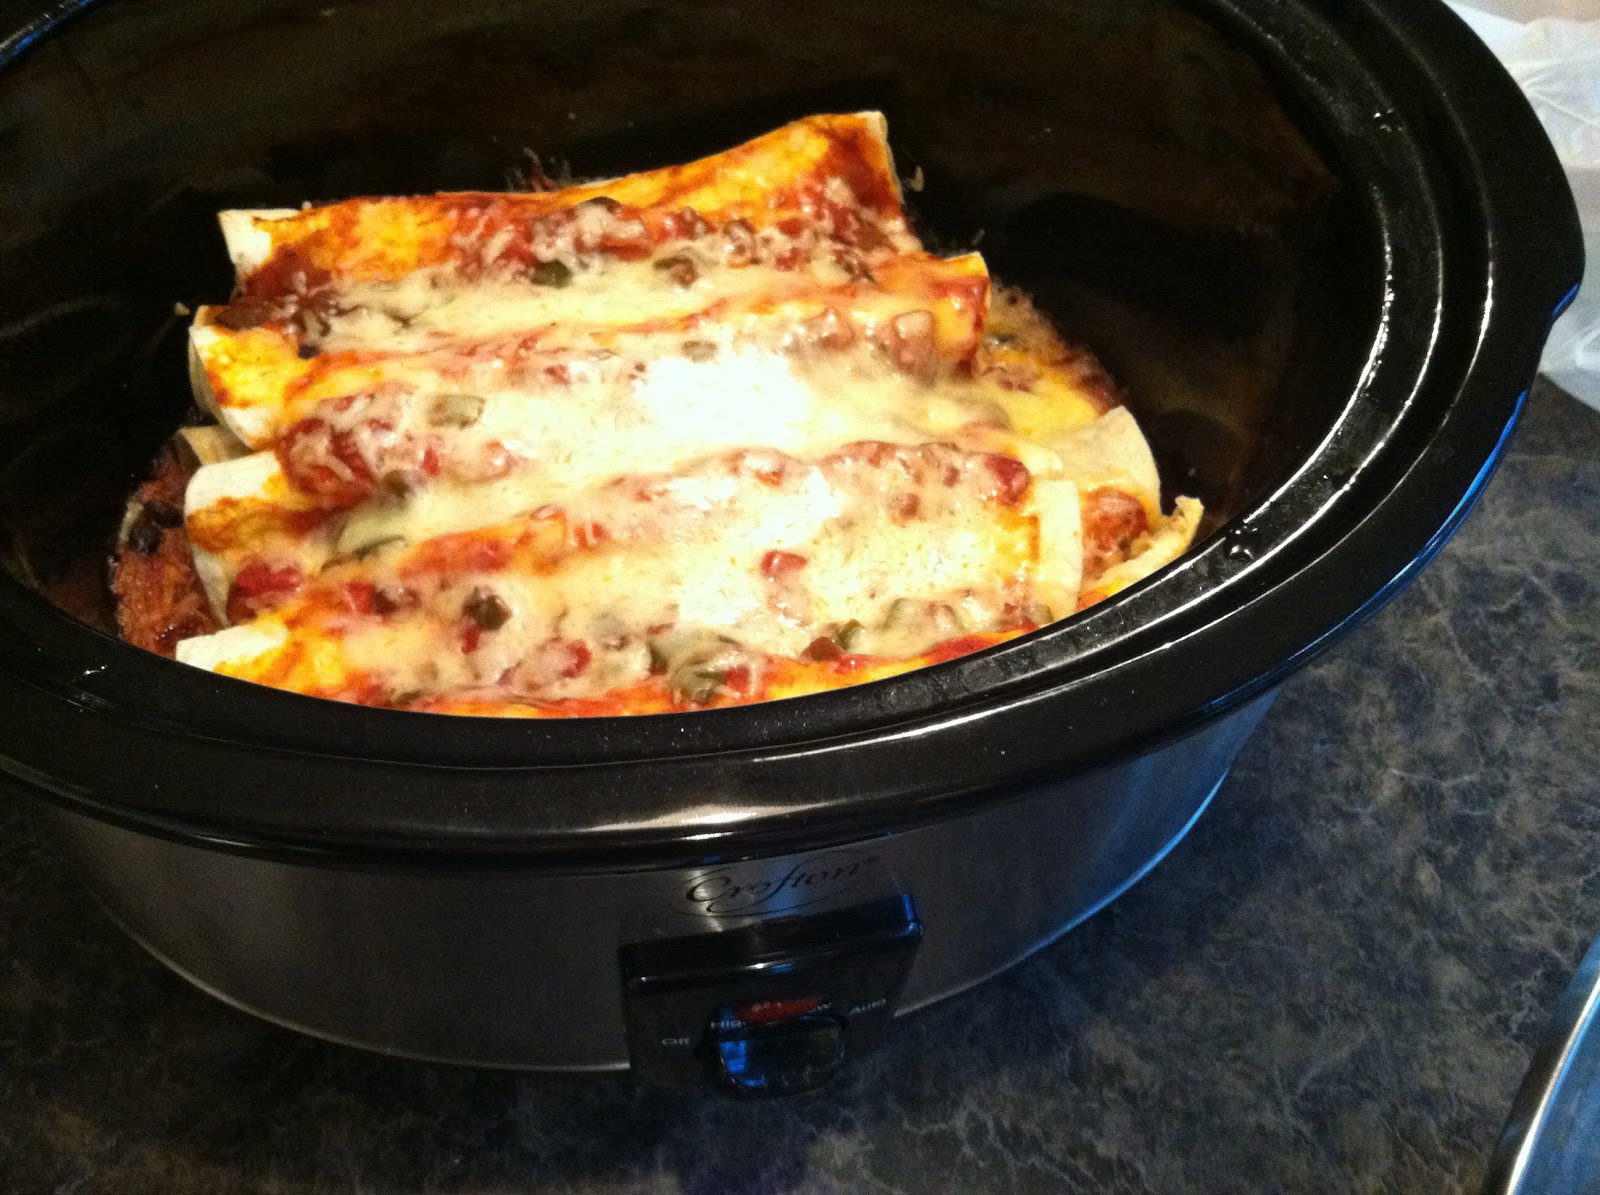
Gluten-Free Crock Pot Vegetarian Enchiladas AND Dessert Enchiladas


Vegetarian Enchiladas

Dessert Enchiladas

I saw a wonderful sounding recipe for enchiladas you can make in your crock pot.  It needed a little tweaking to make it work for me.  Oh boy!  They were delicious!  My darling husband said "Mmm. Wow. Make them again."  Here's what I did:


Spray the inside of your crock pot with non-stick.  Pour 1 cup of chunky salsa in the crock pot.  Chop some red and green sweet bell peppers and half an onion, grate 8 oz. of Monterey Jack cheese and measure out some salt, cumin and garlic powder.  Rinse and drain a can of black beans and pour into a medium bowl.  Add the veggies and spices and stir until combined.  

Scoop 1/3 cup onto one side of a flour tortilla and add 1 tablespoon of cheese; roll up and place seam down in the crock pot.  Roll and add until you have 5 or 6 side by side in the bottom of the crock.  

Pour 1 cup of salsa over them, and spread with a spoon.  Sprinkle half of the cheese evenly over the salsa.

Fill and roll tortillas until filling is gone.  Pour the rest of the salsa over the top and spread so all the tortillas are moistened with the salsa.  Don't add the rest of the cheese yet.


Cover, turn to High and cook 2 - 3 hours or until heated through.  

 Sprinkle with the remaining cheese, cover and let sit until the cheese melts.

Crock Pot Vegetarian Enchiladas
Adapted from recipe found at thekitchn.com
Serves 4 - 6, 2 enchiladas per serving

1/2 cup finely chopped onion
1 cup chopped sweet bell pepper
1 (16 oz.) can black beans, rinsed and drained
2 teaspoons chili powder
1/8 teaspoon garlic powder
1 teaspoon cumin
1/4 teaspoon salt
2 cups (8 oz.) shredded Monterey Jack cheese
32 oz. chunky salsa
10 - 12  8" flour tortillas, I use gluten-free corn tortillas

Spray inside of crock with non-stick.
Pour in 1 cup of salsa.
Combine onion, bell pepper, beans and spices.
Scoop 1/3 cup onto a flour tortilla.  Add 1 tablespoon cheese.  Roll up and place seam side down in crock.
Continue filling and rolling until you have a layer of enchiladas snugly side-by-side.
Pour half of the salsa over and spread to moisten the tortillas.  
Sprinkle with half the cheese.
Repeat filling and rolling until filling is gone.
Pour remaining salsa over the enchiladas and spread to moisten.  Don't add remaining cheese yet.
Cover and cook on High 2-3 hours or until filling is hot.
Sprinkle with remaining cheese, recover and let stand until cheese melts.
Make Salsa Rice.  Recipe link: http://www.food.com/recipe/salsa-rice-97070

Serve with Salsa Rice and corn. Corn completes the protein of the beans.

Dessert Enchiladas
When you have a pack of 12 tortillas and the dinner recipe only uses 10 of them, then make Dessert Enchiladas in your microwave.


Spread a teaspoon or so of peanut butter on one side of a flour tortilla.  Head's up: corn tortillas don't taste as good.

Add a tablespoon of chocolate chips.
And some mini marshmallows.  Roll up, microwave 45 seconds until the marshmallows are gooey.
Walt got the green plate, I got the pink plate.  Oh, yum.  Peanut butter cup meets s'more.  


Saturday, August 27, 2011

Three Winning Crockpot Recipes

It's canning season, which means even though I'm cooking all day, I have very little time to cook dinner.  So, I've been using my crockpot for several meals each week and I've found three that are easy, inexpensive and delicious. 

The first is a variation on a recipe that was very, very salty the first time I made it.  So I changed it up a bit and omitted a second salty seasoning package.  If you like lots of salt, you can add in a package of Au Jus mix.

Cube Steaks with Gravy for the Crockpot
2 lbs. cube steaks
1 can Low-Sodium Golden Mushroom Soup, undiluted
1 can Low-Sodium French Onion Soup, undiluted
1 envelope Brown Gravy mix

Spray the interior of your crockpot with non-stick.  Lay the cube steaks in one layer, arranging to overlap as little as possible.

Combine soups and gravy mix in a small bowl.  Pour over.

Cover and cook on low 8 hours.  Very, very good served hot sandwich style on hearty white bread.


Chicken Cordon Bleu for the Crockpot
I made real chicken cordon bleu when I was young and insane childless in my early 20's.  It took forever to prepare, but was heaven to eat.  First you had to pound the chicken breasts very thin, then layer on ham and swiss cheese, then roll them up, bread them, saute them and finally bake them.  It took  F O R E V E R.  One day, I vowed never again!  However, every now and then I'd get a hankering and buy some frozen ones, hoping they'd satisfy.  Trust me, those little frozen bundles don't even come close. 

This recipe is even easier than the frozen ones, and far better all around.  It hits all the flavor and texture notes of the labor intensive version.  The chicken stays moist and tender, the cheese is melty, the ham is sweet and salty and the stuffing mix adds the crisp breading texture and flavor.  Best of all, this is a plop and cook meal.

6 boneless, skinless chicken breasts
6 slices deli ham, or sandwich slices
6 - 12 slices swiss cheese, enough to cover each breast
1 can low-sodium cream of chicken soup (the cheese, ham and stuffing mix are salty)
1 (6 oz.) box chicken stuffing mix
1/4 cup (1/2 stick) butter, melted

Spray your crockpot with non-stick.
Combine milk and soup in a bowl.  Pour half into the bottom of the crockpot.  Add chicken in one layer, arranging to overlap as little as possible.
Place a slice of ham on each breast, then cheese.
Pour remaining soup mixture evenly over all.
Sprinkle evenly with stuffing mix.  If your mix comes with a seasoning packet, sprinkle it over.
Drizzle with melted butter.
Cover and cook on low 6 to 8 hours.  Note: any stuffing that falls into the gravy will soak it up.  If you like wet stuffing, you'll love it.  If not, don't spoon the gravy from the bottom of the pot over the stuffing when you serve it.

Beef Strogonoff for the Crockpot
If you've ever made strogonoff, you know it's easy but tricky and expensive.  The expensive part is the original recipe calls for beef tenderloin aka filet mignon.  The tricky part is getting the beef cooked just so.  Cook beef tenderloin too long and it gets dry and tough.  This recipe solves that with stew meat.  Stewing meat is a mixture of cuts, mostly chuck, which is very flavorful, but chewy.  The long, moist cooking makes stew beef nice and tender.  Like many of my recipes, this is one I found and changed to make better.  In this case, I added a tiny bit of bacon and browned the meat.  Doing this added tons of flavor without much expense or time.  I browned the beef the night before and refrigerated it.  The next morning, I just tossed everything in the cooker and turned it on.  If you're short on time, you can omit the browing step, but the flavor won't be as rich.  The sour cream is added at the end, without cooking, so it doesn't curdle.  I like it better without.

1 lb. beef stew meat, cut in about 1/2" chunks
salt and pepper
1/2 cup flour
1/4 cup olive oil
2 strips bacon, diced (I cut my bacon with kitchen shears right into the pan)
1/4 cup water

1 can low-sodium Golden Mushroom soup, undiluted
1/2 cup onion, chopped
1 tablespoon worcestershire sauce

1/2 cup sour cream, plain yogurt or cream cheese (optional)

Pat the beef dry with paper towels.  Season the flour with salt and pepper in a large bowl.  Add the beef and toss to coat.  Shake off excess flour from beef and throw away the extra flour.  The extra makes it easier to coat the beef.

Heat a large, high sided pan over medium heat.  I use my dutch oven - the high sides help trap the spatters. Add 1 - 2 tablespoons oil, enough to coat the bottom well, and allow to heat a few seconds.  Add the chopped bacon.  Cook and stir until bacon is almost crisp.  Remove it to a paper towel lined heat proof bowl with a slotted spoon.

Working in batches scatter some beef in the hot oil.   Don't crowd the pan.  Putting less meat in will let it brown faster.  It usually takes me 3 batches to brown up one pound of meat.  Cook without stirring for at least 3 minutes. Turn over a piece and see if it's browned, if it is, stir them all to brown the other side.  When both sides are browned, remove with slotted spoon to the paper towel lined bowl.  Add more oil to the pan if needed and brown up all the beef. 


After all the beef is browned, if there are any burnt patches are on the bottom of the pan, scrape them off and throw away or your gravy will taste burnt.  Add water to the pan and stir to scrape up all that browned goodness.  (The French call it fond, Emeril calls it The Love).  Remove the paper towel from the bowl and discard.   Add that browned lovely liquid to the beef in the bowl. It may have thickened a bit from the flour left in the pan, and that's ok.
At this point, you can cover and refrigerate the beef for later use.

The next morning:
Spray your crockpot with nonstick.  Combine all ingredients right in the crockpot.  Cover and cook on low 8 hours.
JUST BEFORE serving, quickly stir in the dairy.  Don't cook it or the dairy may curdle. 
Serve over hot cooked noodles.

Wednesday, March 2, 2011

Crock Pot Yogurt!

I saw this recipe at Crockpot Recipe Exchange and had to try it.  I love low fat Greek yogurt, but at a buck for a tiny tub, it's expensive.  I also use plain yogurt as a swap for sour cream in cooking and it's almost impossible to find in recipe quantities. So, after seeing the recipe, I thought I'll make a half recipe of yogurt, use some of it for cooking and smoothies and drain the rest to eat for lunch or healthy snacking.  Sounded like a plan to me!

I bought a half gallon of 1% milk and poured 4 cups of it into my small (3-4 quart) crock pot.  I set it to High and set the timer for 2 1/2 hours.  Once that was done, I turned the cooker off and let it sit for 3 hours without opening the lid. 

After 3 hours, the milk had cooled to around 90-110F.  I stirred in 1/4 cup live culture Greek yogurt and 6 tablespoons (1/4 cup + 2 tablespoons) dry whole milk powder.  I found that in the Mexican food aisle at Walmart.  It was about $3.50 and it will last a very long time.  I'll use it in my bi-weekly bread making as well. I like that it's in a resealable container.

Then I wrapped the entire crock pot in a large bath towel and left it overnight.  I ended up with a pourable, silky smooth, mildly tart yogurt.
Pourable.  Not as thick as I imagined it would be.  But, perfect for cooking and smoothies! I poured half into a container and stashed it in the refrigerator; the other half I strained for Greek style yogurt. I lined a mesh strainer with a coffee filter, suspended it over a bowl and added the yogurt to the filter.  I covered it with a clean dish towel and put that in the fridge to drain.  A couple hours later:
I had Greek yogurt!  Oh, the things I can make! Tzaziki sauce for homemade gyros and fruit parfaits are the two that jumped to mind.  I scooped some out, added a spoon of jam.  Heaven.  Oh, my.  No graininess like in store bought.  Not overpoweringly sour.  Silky...

A couple hours later, I was notified by my lactose intolerant digestive tract that perhaps next time I should let it culture a little longer so that all the lactose was converted.  My daughter did a little research and concluded that it probably didn't stay within the culturing temperature range long enough.  I wondered if my cold-from-the-fridge yogurt cooled it too much or if the towel didn't maintain the heat.

So, next time, and there WILL be a next time, I'll a)allow my starter to reach room temperature before adding it and b)warm my oven for a few minutes, turn it off and tuck my crock pot insert, still covered, into the warmed oven to culture overnight.  I'll let you know how it goes.

If you are wondering how yogurt fits into The Plan - it counts cup for cup as milk. 

More PLANned Comfort Food - Crockpot Cassoulet

Cassoulet
This isn't quite the French classic.  It only has one kind of meat (or no meat at all - read on).  The flavors in this simple stew are so rich and well balanced that YOU MUST TRY IT.  Seriously, you must. 

Here's how it starts:

A package of kielbasa or smoked sausage (in this case Turkey Kielbasa), some carrots, garlic, onion, beans, tomato sauce, brown sugar, thyme and red wine. To make this vegetarian, substitute another can of rinsed, drained beans for the kielbasa.

The red wine is French genius at work. Somehow, a little bit of red wine transformes "very good" into "WOW".  I am assured that the alcohol cooks out, so it's safe for the kids. The wine needn't be expensive - I used Winking Owl, which I think I bought at Aldi for under $5.00.  Three Buck Chuck works, too.  Just make sure it's something you'll want to drink, because you'll want a glass with dinner, and cooking with wine won't make the wine better.  However, if you don't drink or if you have a red wine sensivity, use an equal amount of broth.  I haven't tried it with vegetable broth, so you're on your own there.

This isn't my recipe.  Like most of my really good recipes, I found it.  Taste of Home Contest Winning are great cookbooks.  This is from 2004, which is the TOH cookbook I reach for most often.  I did, however, adapt it to the crockpot.

French Country Casserole
1 lb. kielbasa or smoked sausage, cut diagonally into 1/4" slices
4 carrots, sliced into 1/4" coins
1 medium onion, peeled, halved and sliced into 1/4" half moons
3 (15 - 16 ounce each) cans beans, 1 each kidney, cannelini, and black, rinsed and drained
2 (8 ounce) cans plain tomato sauce
1/2 cup red wine or beef broth or vegetable broth
2 level tablespoons light brown sugar, NOT packed (if you must pack, only use 1)
2 cloves garlic, minced
1 1/2 teaspoons dried thyme, crumbled

Spray the interior of your crockpot with non-stick.  Add all ingredients and mix well.
Slow cook on Low 8 - 10 hours, depending on how crunchy you want your carrots.

10 servings, 241 calories per 1 cup
PLAN numbers: 6 1/5 ounces meat, 1/2 cup vegetables

Thursday, January 27, 2011

PLANned Leftovers - Pork Roast Take 2

Pulled Pork Sandwiches

Walt was rather surprised when I made a 3 lb. roast for just the two of us.  I had plans for that roast.  Here is dinner number two.  I wanted to make pulled pork, but I wanted it to fit into several requirements:
  • moist, fall-apart tender meat
  • filling & satisfying
  • well balanced flavors
  • fit into The Plan - these sandwiches clock in nicely at 4 ounces meat, 4 ounces grain (buns), 1/3 cups vegetables (V8 ), 1/4 cup fruit (BBQ sauce) per 2 sandwich serving


I wanted to use my crock pot to make the meat fall-apart-tender and moist.  But, barbeque sauce will get gluey and burn in extended cooking.  My solution - braise the meat in V8 Juice and add the barbeque sauce at the very end.  It worked perfectly.  The moist cooking made for moist meat. 

I wasn't sure about this idea, so I only made enough for one meal.  We were both sad that it was gone.  I'll be making it again SOON.    Here's what I did:

Pulled Pork from Leftover Roast
8 ounces leftover sliced pork loin roast (about 4 slices)
1 (6 ounce) can Spicy V8 Juice
1/2 cup Sweet Baby Ray's Original Barbeque Sauce
4 (2 ounces each) hamburger buns, 80 calorie or less, such as Healthy Choice brand

Spray the inside of a small crockpot with non-stick.
Pour in the V8 Juice.  Add the pork slices.  Turn them to coat with V8.  You should have a couple overlapping layers of pork.  If you don't, increase the quantities so it doesn't burn*.
Cook on high 3 hours, or on low 5 hours.
Using a potato masher or 2 forks, shred the meat.
Add barbeque sauce; stir to combine.  Recover and allow sauce to heat, about 5 minutes while you toast the buns.  Stir again and serve over toasted buns.

This recipe is so simple that you can double or triple it easily.  *Be careful about the ratio of meat and V8 Juice to the size of your crock pot.  If you have a large crockpot, you'll want to increase the quantities of everything.  You could also put the ingredients into a smaller heatproof container, cover it with foil and set that inside your crockpot. I've never used that method - so I can't comment on how well that works.

We used up the leftover roasted root vegetables as our veggie side.  Next time I'll make my Almost Fat-Free Asian Coleslaw improved version:

Almost Fat-Free Asian Coleslaw 
1/2 cup white corn syrup
1/4 cup orange juice
1 teaspoon toasted sesame oil (from the Asian foods aisle)
2 teaspoons low sodium soy sauce
1/4 cup seasoned rice vinegar OR apple cider vinegar
1 pinch ground cayenne pepper
1 (16 ounce) bag coleslaw mix, shredded style
1 teaspoon toasted sesame seeds
2 scallions, sliced diagonally

Combine the first 6 ingredients. Add the cole slaw mix. Stir and let sit 30 - 60 minutes. Stir in sesame seeds and scallions just before serving. 4 servings, about 165 calories each

Monday, November 8, 2010

Crockpot Oatmeal & Oatmeal Muffins

My women's Bible study meets Wednesday mornings.  We all take turns bringing breakfasty treats.  Last week was my turn.  We had enjoyed a unusually warm early autumn until then, but Tuesday was looking and feeling like autumn.  It was briskly cool and windy, with low skies full of dark puffy clouds, hinting at the possibility of cold, soaking rain. All of which put me in the mood for oatmeal.

I've heard friends talk lovingly of crockpot oatmeal, but had never sampled it.  The recipe wasn't on the back of the oatmeal canister, so I hit the internet and found several.  None of them was quite right for what I wanted - basic creamy oatmeal.  I read the reviews of each, picked the most likely candidate and made it mine.  Here's the recipe I started with:  Crock Pot Fruited Oatmeal and this is what I did:

Basic Creamy Crockpot Oatmeal
Day 1 (the night before serving)
2 cups 1% milk
1/2 cup water
1 tablespoon butter
1/8 teaspoon salt
1/2 teaspoon cinnamon
1/4 cup brown sugar
1 cup steel cut oats
Day 2
1/2 to 1 cup milk
1/4 to 1 cup water
1 cup chopped apples
1/2 cup raisins
1/2 cup chopped walnuts

Spray the inside of the crock very well with nonstick.  Add all Day 1 ingredients, stir.  Cover. 
Use the delay feature on your crockpot and set it to cook on low for 6 hours, to be ready in the morning.  I don't have a delay feature, so I plugged my crockpot into a timer (the kind you use for holiday lights).
The next morning, stir in the Day 2 ingredients.  Use a much or as little as you like. Don't worry if you have a brown crust coating the inside of your crockpot.  It's not burnt.  Scrape a bit off and taste it to reassure yourself that it doesn't taste burnt.  Then scrape it down and stir it into the oatmeal.  It gives a nice toasted "oatmeal cookie" flavor.
Makes 5-6 1 cup servings.

I made a double batch, because my Bible study group has 12 members.  Unfortunately, only half of them attended last week.  I had 5 cups of leftover oatmeal.  BUT, I have a really great muffin recipe.

Oatmeal Muffins
1 cup flour
1 cup packed brown sugar
1 teaspoon baking powder
1 teaspoon baking soda
1 cup chopped walnuts OR raisins OR dates
1/2 cup canola oil
2 eggs
1 cup leftover oatmeal
1 teaspoon vanilla

Preheat oven to 350F.  Place paper liners in a 12 cup muffin tin.
In a large bowl, combine flour, brown sugar, baking powder, baking soda and nuts or raisins.  In another bowl, combine oil, eggs, oatmeal and vanilla.  Stir wet ingredients into dry ingredients just until moistened.

Fill muffin cups two thirds full.  Bake 18-22 minutes or until muffins test done with a toothpick.  Muffins will be flat on top.
Makes 12 - 13 muffins.

I made 5 dozen muffins.  I used walnuts until I ran out of nuts, then raisins until I ran out of raisins, then finished up with dates; using up the last of the eggs, brown sugar, dates and oatmeal.  These muffins freeze well, and taste fresh baked when thawed.  Walt took a dozen to work, I took a 1/2 dozen to the Extraordinary Women conference and we have 3 dozen in the freezer.  The last 1/2 dozen?  Yum.

Thursday, October 21, 2010

Italian Crock Pot Chicken

Italian Crock Pot Chicken
It's autumn, the time of year when I start craving richly flavored slow cooked foods.  I wanted an Italian chicken dinner and daydreamed about a recipe I used to make a very long time ago, which contained stewed tomatoes, onions, garlic powder and chicken.  You plopped the chicken breast on a piece of foil, added the veggies, closed it up and baked it.  It was yummy, but didn't make enough sauce; and the 45 minute baking time seemed interminable after a long day at work.  I had a baby eggplant and some sliced cremini (baby portabella) mushrooms that needed to be used up.  Here's what I came up with:

The Ingredients
1 small eggplant, peeled and cut in 1/2" cubes (about 1 1/2 cups), optional
1 medium onion, sliced in half moons
1 rib celery, thinly sliced
1/2 large carrot, sliced in half moons
1/2 cup coarsely chopped crimini mushrooms
4 cloves garlic*, minced
4 boneless, skinless chicken breasts, still frozen
1 pint home canned tomato chunks or a 14 -16 oz can
1 (15 oz.) can tomato sauce
1 Tablespoon red wine vinegar
1 Tablespoon tomato paste
1 Tablespoon Italian seasonings
1 teaspoon garlic powder*
1/8 teaspoon salt
1/4 teaspoon ground black pepper
1 stem fresh rosemary
*we really like garlic!  Feel free to reduce the quantities.

Spray the slow cooker with non-stick.  Place onions, carrot, celery, mushrooms and eggplant (if using) in the bottom of the slow cooker.  Place chicken breasts (still frozen) on top of the veggies.

In a bowl, combine tomato paste, tomatoes and their juice, tomato sauce, chopped garlic, garlic powder, spices and vinegar.  Pour over chicken.  Place rosemary stem on top.

Cook on High 4-6 hours, propping the lid open with a toothpick the last hour, to help thicken the sauce.
Serve over hot cooked spaghetti with slabs of fresh, buttered bread.

The aroma was mouth-watering!

The eggplant gives a slight cinnamony flavor when it cooks with tomatoes, which I LOVE and my husband tolerates.  The next time I make this, I will leave out the eggplant.

I was delighted at how well this turned out.  The chicken wasn't dry, because it goes in frozen on top of the veggies.  Bone in chicken would be even juicier.

Saturday, August 21, 2010

Crock Pot Thai Chicken

I found this recipe years ago; before I ever tried Thai food.  Last night I found this long-lost, untried recipe and printed it out.  Today was a busy day, and while taking the bread out of the oven, I was shocked to see it was 1:00.  I hadn't given a thought as to what to make for dinner, let alone take it from the freezer.  I pulled out this recipe and - YES! it uses frozen chicken!  I had everything except rice noodles, but we were going shopping after working out at the gym.  This could work.  I glanced at the clock. This would have to work.  I pulled out the ingredients:

The recipe called for chicken breasts and cooks on low for 8 hours.  I didn't have 8 hours; but I did have chicken tenders and adjusted the cooking time to 1 hour on high, then 4 1/2 on low.  It turned out GREAT!  A new go-to recipe, since I almost always have all the ingredients in the house.

Crock Pot Thai Chicken
4 servings
1-1/2 pounds (about 4) boneless, skinless chicken breasts, individually frozen, still frozen
3/4 chunky salsa (any heat level)*
1/4 cup peanut butter
3 cloves garlic, minced
2 tablespoons lime juice
1 tablespoon soy sauce
1 teaspoon dried ground ginger
Hot cooked rice noodles (I substituted angel hair pasta - have you seen the price of rice noodles lately?)
Garnish:
1/4 cup chopped peanuts, optional
2 tablespoons chopped fresh cilantro (highly recommended)

* it will end up slightly less hot than the salsa used.

  1. Spray crock pot with non-stick.  Place chicken in crock pot.
  2. Combine salsa, peanut butter, lime juice, soy sauce, ginger and garlic.  It looks disgusting.
  3. Pour over chicken.
  4. Cook on low 8-9 hours or until chicken is done.
  5. Place on a mound of noodles on each plate, add a chicken breast (or 2 tenders).  Spoon additional sauce over chicken.  Garnish. 
I forgot to garnish before taking the photo, we used cilantro and it is perfect.  We didn't bother with the peanuts, because I couldn't find them in the fridge with all the garden vegetables in the way.


I served it with Garlic Green Beans, my own invention.  Well, really it's a copycat of the beans served at Asian Cuisine's buffet.  We keep going back for more, and more, and more - it's embarrassing.

Garlic Green Beans
serves 4-6 (or me and Walt)
2 lbs. fresh green beans, trimmed
8 cloves garlic, minced
1 Tablespoon olive oil
1 Tablespoon bacon drippings (or butter or additional oil)
1 teaspoon soy sauce

  1. Heat a large skillet or wok over medium heat.  Add oil and drippings.  When the oil is hot, add the garlic and immediately reduce the heat to low.  Cook, stirring 2 minutes.  You don't want the garlic to turn brown.  It will get bitter and ruin the oil. 
  2. Using a slotted spoon, remove the garlic and keep it for later.  You now have garlic flavored oil.
  3. Increase the heat to medium-high, and add the green beans.  Be careful of spatters.
  4. Using tongs, turn the green beans to coat with oil and allow all beans contact with the hot pan.  Keep turning the beans for 5-7 minutes, or until beans start to change color slightly.  Taste a bean and see if it's cooked to your liking.  Some people like them crisper, some like them slightly wilted. Add the soy sauce and turn to coat.
  5. Remove from heat and add the reserved garlic, using tongs to turn the beans so it's well distributed.
  6. Serve.