
 My love for kitchen gadgets is legendary in my family. My husband firmly guides me past the doors of Williams Sonoma while half-jokingly telling me to "Resist!, Resist!" Half-jokingly, because if left to my own desires, I'd be in there in a flash and stay for hours. A few years ago, my heart was set on a mandolin. I'd tell him earnestly about all the wonderful things I could make if I only had a mandolin. I put it on my Christmas Wish List - and my darling husband gave it to me for Christmas, even though he couldn't understand why I would need such a thing. I'm pretty good with a chef's knife. These pickles are cut in perfect 3/8" slices - on my mandolin.
After the cucumbers are cut, the red peppers and onions are sliced by hand into 1/8" strips. They all go into a very large bowl and are tossed with canning salt*, covered with a clean kitchen towel and allowed to rest at room temperature at least 3 hours. The salt draws excess moisture out of the vegetables, which helps make them crispy in the end. After the resting period, the vegetables are rinsed and drained several times. Then allowed to drain very well. I put the colander back into the large bowl and let them drip while I get my jars, brine and canner ready.
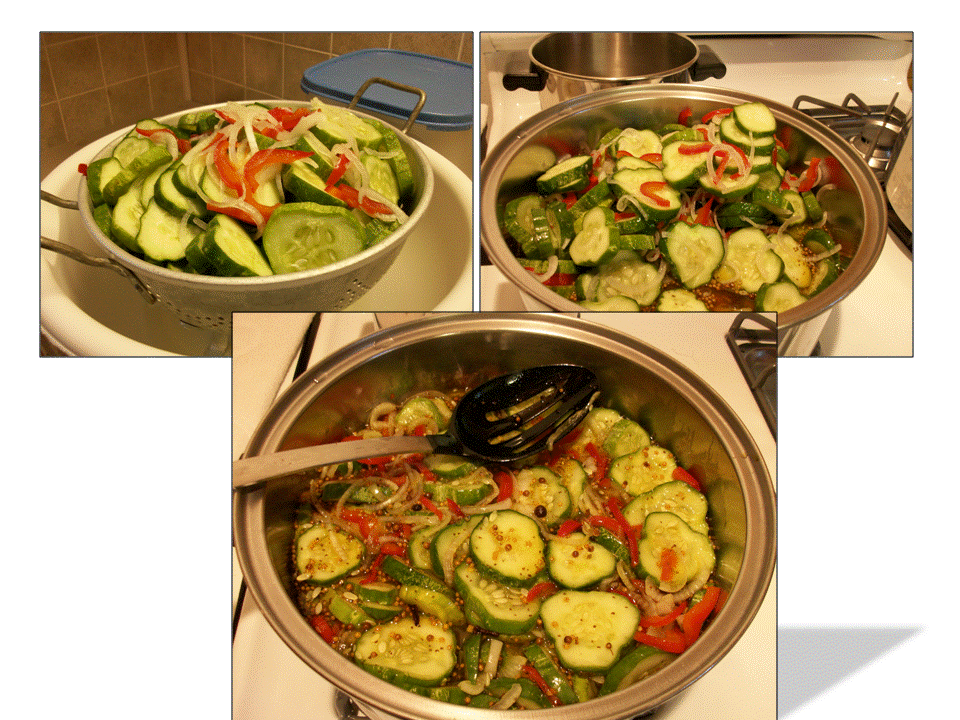 |
| Sugar, vinegar and spices are heated to a boil; the vegetables are added and it's brought back to a boil. The hot vegetables are packed with a slotted spoon into hot jars, the brine is poured over and any air bubbles are removed by jiggling a non-mettalic spatula between the veggies and the sides of the jar. Then the jar rims and threads are wiped clean, hot lids are placed, the rings are screwed on and the jars take a 10 minute boiling water bath. |
 |
| When the timer goes off, the jars come out. |

 |
| Aren't they beautiful? Can't wait to open... |
As you can see in the photo, my cookbooks have notations scribbled all over the pages. As the years go by, I adjust the spices to suit my tastes. However, it's important to never change the amounts of sugar, vinegar, salt or water in a canning recipe. They are carefully balanced for food safety.
Here's my favorite Bread N' Butter Pickle recipe, adapted from Complete Book of Small-Batch Preserving:
4 lb. small pickling cucumbers (kirby)
2 onions, peeled, halved and cut into 1/8" half moons
2 sweet red peppers, cut in thin strips
2 tablespoons canning salt
_ _ _ _ _ _ _ _ _ _ _ _ _
4 cups cider vinegar
3 cups granulated sugar
1 tablespoon mustard seeds
1 tablespoon mixed pickling spices
1 teaspoon celery seeds
1/2 teaspoon turmeric
1/4 teaspoon ground cloves
_ _ _ _ _ _ _
Ball Pickle Crisp Granules
Scrub cucumbers well to remove grit and spines. Cut a small slice off each end and discard them. (They contain enzymes that could cause the pickles to be soft). Cut cucumbers into 3/8" slices. Place cucumbers, peppers and spices in a large non-reactive bowl and toss with canning salt. Cover with a clean kitchen towel and allow to rest for at least 3 hours or overnight.
Drain the vegetables in a large colander and rinse well with several changes of cold tap water, drain and leave in colander. Place colander with vegetables in a large bowl to catch dripping water. Allow to drip, shaking occasionally, while preparing brine and jars.
Fill your canner 3/4 full with cold water. Place the rack inside the canner. Place the clean jars on the rack, allowing the water to fill the jars. Cover and heat to boiling. When it boils, reduce heat to a simmer. Keep jars in the simmering water until ready to fill.
Fill a small pot with cold water; heat to a simmer. After you've filled your jars, you'll know how many lids to heat. Place the lids into the simmering water to heat.
In a pot large enough to hold vegetables and brine, combine the vinegar, sugar and spices. Heat to a boil. Add the vegetables (discard the water in the bowl), press gently into the brine and return to a boil. Boil 30 to 60 minutes, or until the cucumber skins go from bright green to olive green. Reduce to a simmer.
Remove jars from the canner. Cover the canner and increase the heat to bring water back to a boil.
Using a slotted spoon and a canning funnel, fill the jars with the hot vegetables, jiggling the jars to distribute evenly and pressing down with the back of the spoon to pack the jars well. Spoon Ball Pickle Crisp on top of veggies (quarts = 1/4 teaspoon per jar, pints = 1/8 teaspoon per jar).
Ladle hot brine over the vegetables, remove air bubbles and top off the brine if necessary to within 1/2" of the rim.
Wipe the jar rims and threads with a hot damp paper towel to clean off any drips. Add hot lids and rings; screw on to just finger tight.
Carefully place jars back into the canner. The boiling water should be at least 1" above the top of the jars. If not, top off with water from the small pot. The water will stop boiling while you are adding the jars. Begin timing from the moment the water starts boiling again. Quarts = 15 minutes, Pints = 10 minutes.
Cover a heat proof surface with a clean kitchen towel. When the timer goes off, turn off the flame and carefully remove the jars from the canner. Place close together, but not touching, on the towel. Cover with several more towels and leave undisturbed at least 12 hours.
Within a few minutes, you will hear the most delightful 'pings'. That is the sound of success, as your jars announce they are sealed.
After 12 hours, remove the towels and check each jar for seal by pressing gently down on the center of each lid. It shouldn't move. If it does, place it in the refrigerator and use within a month.
Don't forget to label your jars with contents and date.
*It's important to use canning salt for several reasons. Mainly, salt is not just salt. Table salt has iodine and anti-caking agents added to it, which will make your brine cloudy and give a metallic taste to your pickles. Sea salt and kosher salt have different weights than canning salt, so you'll end up with too much or too little salt. Since salt is an important preservative, too little can mean your pickles go bad.
No comments:
Post a Comment
Please leave me a comment.