Thursday, August 26, 2010

Adventures in Couponing

I've been shopping out of my pantry, freezer, garage and former linen closet for a while now; buying mostly dairy, meat and produce. I've also been able to "shop" out of my garden quite a bit.  However, there were a few items I needed to get at Walgreens because the deals were really good and I was running low.  Crest 3D White toothpaste is my new preferred brand, ever since getting a free tube.  The bad thing is it retails for $4.49 a 5.3 ounce tube! Wags had a good deal going this week: 3 tubes for $9 with $4 register rewards.  AND I had a .75/1 coupon.  So that brought it down to $1.41 a tube!  I think I did really well there!
2 jars Skippy 2/$4 - $1/2 coupon = $3.00
3 tubes Crest 3D (3 month supply) $9 - $4.75 = $4.25
2 packages Vanity Fair napkins BOGO = $2.99 for both
Hallmark card (don't look Beatriz!) full price
sandwich bags $.99
Barilla pasta $.99
Scrubbing Bubbles Mega Shower $3.50- $1 coupon = $2.50
$17.57 for everything

Next up - Walmart

Reynolds Wrap $3.32 - $.75 coupon = $2.57
2 mentos gum $2.56 - $1 coupon = $1.56
Dentastix - $2.98 - $2 coupon = $.98
4 pack 3 blade razors $2.97 - $1.00 = $1.97
Bisquick $2.92 - $.50 coupon = $2.42
$9.50 for everything


My hints:
Buy it on sale and use coupons! Use the sites below to find coupons.
Watch out for things that are just pretending to be a sale.  Example: Strawberries for $3.99 on BOGO (buy one get one free).  Sounds good, BUT other stores had strawberries for $1.99.  Not really a sale, they're just getting you to buy two!
Load your loyalty card (i.e. Jewel's Preferred Card) by visiting the store corporate website and logging in your card number.  Up will pop a list of just-for-you deals that will load on your card (no clipping). The deals stay on your card 2-5 days, so do it on shopping day. While you're there, sign up for emails.  I got coupons for Free Bakery Bread and Free Produce one week!
Swipe your CVS card as soon as you walk in the door.  Extra just-for-you coupons will print, good for that day only. I've gone home and got manufacturer's coupons and gone back so I can stack them.
Stock up.  Grocery items are on a 3 month cycle.  At some point they're at their most expensive and at the other point they're at their cheapest.  If you are financially able, it's a good idea to buy 3 months worth of product at it's lowest price.  Not necessarily all at once, but stop adding to your stash when you have a 3 month supply. I don't want to see you on Hoarders.  For the next 3 months, you get to shop for that item from your stash.  Not everything is on the same 3 month cycle.  July was dairy. This month it was body wash, shampoo and razors. For September look for deals on lunchbox items, soup and organic items.
Buy only items and brands that your family will use.  Stock up time is not the time to experiment with new brands.  Try one; use it right away and if you love it, go back for more.
Know your weaknesses.  I love cleaning supplies.  If it says it'll clean it better, quicker or deeper I'm fighting temptation to try that new product that will revolutionize the way I think about cleaning.  I find that's rarely the case; and often old (really old) products work best.  How old?  How about these brands: Comet (great for toilets), Bar Keeper's Friend (iron stains), Spic n' Span (floors), Easy Off (gas stove tops) and Grandma's laundry detergent - she made it herself from lye soap and it worked really well!  I now make my own and I'll post about that in the future.
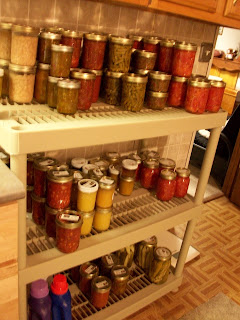
Yep, those shelves are stocked like store shelves. Behind each item are several of the same. Paper towels, cleaning supplies, pop and toilet paper are stored in the garage.


Recommended sites:
http://www.couponmom.com/  matches the Sunday sale flyers to existing coupons.  You click on what you want to buy, print it as a handy shopping list and then clip your coupons.  The coupon date code is on the list. I use this for Jewel, Target, Walmart (prices may vary), Walgreens and CVS.
http://www.coupontom.com/  search for coupons for anything you need that's not currently on sale.  I also double check for coupons for items listed at couponmom - sometimes it will find higher value ones than couponmom.
http://www.jillcataldo.com/  her blog lists the best deals and tells you how to find those coveted catalina deals.
http://www.moneysavingmom.com/ sign up for email alerts.
Free Stuff Finder: "Like" them on Facebook to find out about all kinds of stuff that's free just by asking for it. Usually, there's a clickable link to take you right to it.

Saturday, August 21, 2010

Crock Pot Thai Chicken

I found this recipe years ago; before I ever tried Thai food.  Last night I found this long-lost, untried recipe and printed it out.  Today was a busy day, and while taking the bread out of the oven, I was shocked to see it was 1:00.  I hadn't given a thought as to what to make for dinner, let alone take it from the freezer.  I pulled out this recipe and - YES! it uses frozen chicken!  I had everything except rice noodles, but we were going shopping after working out at the gym.  This could work.  I glanced at the clock. This would have to work.  I pulled out the ingredients:

The recipe called for chicken breasts and cooks on low for 8 hours.  I didn't have 8 hours; but I did have chicken tenders and adjusted the cooking time to 1 hour on high, then 4 1/2 on low.  It turned out GREAT!  A new go-to recipe, since I almost always have all the ingredients in the house.

Crock Pot Thai Chicken
4 servings
1-1/2 pounds (about 4) boneless, skinless chicken breasts, individually frozen, still frozen
3/4 chunky salsa (any heat level)*
1/4 cup peanut butter
3 cloves garlic, minced
2 tablespoons lime juice
1 tablespoon soy sauce
1 teaspoon dried ground ginger
Hot cooked rice noodles (I substituted angel hair pasta - have you seen the price of rice noodles lately?)
Garnish:
1/4 cup chopped peanuts, optional
2 tablespoons chopped fresh cilantro (highly recommended)

* it will end up slightly less hot than the salsa used.

  1. Spray crock pot with non-stick.  Place chicken in crock pot.
  2. Combine salsa, peanut butter, lime juice, soy sauce, ginger and garlic.  It looks disgusting.
  3. Pour over chicken.
  4. Cook on low 8-9 hours or until chicken is done.
  5. Place on a mound of noodles on each plate, add a chicken breast (or 2 tenders).  Spoon additional sauce over chicken.  Garnish. 
I forgot to garnish before taking the photo, we used cilantro and it is perfect.  We didn't bother with the peanuts, because I couldn't find them in the fridge with all the garden vegetables in the way.


I served it with Garlic Green Beans, my own invention.  Well, really it's a copycat of the beans served at Asian Cuisine's buffet.  We keep going back for more, and more, and more - it's embarrassing.

Garlic Green Beans
serves 4-6 (or me and Walt)
2 lbs. fresh green beans, trimmed
8 cloves garlic, minced
1 Tablespoon olive oil
1 Tablespoon bacon drippings (or butter or additional oil)
1 teaspoon soy sauce

  1. Heat a large skillet or wok over medium heat.  Add oil and drippings.  When the oil is hot, add the garlic and immediately reduce the heat to low.  Cook, stirring 2 minutes.  You don't want the garlic to turn brown.  It will get bitter and ruin the oil. 
  2. Using a slotted spoon, remove the garlic and keep it for later.  You now have garlic flavored oil.
  3. Increase the heat to medium-high, and add the green beans.  Be careful of spatters.
  4. Using tongs, turn the green beans to coat with oil and allow all beans contact with the hot pan.  Keep turning the beans for 5-7 minutes, or until beans start to change color slightly.  Taste a bean and see if it's cooked to your liking.  Some people like them crisper, some like them slightly wilted. Add the soy sauce and turn to coat.
  5. Remove from heat and add the reserved garlic, using tongs to turn the beans so it's well distributed.
  6. Serve.

Thursday, August 19, 2010

Garlic Dills

Making pickles is pretty much foolproof.  Keep it sanitary, follow a recipe and you get pickles.  If you want to get good pickles, as opposed to pickles that are merely safe to eat, you have to try a few recipes and understand how the crisp gets into the pickle.  Cold will do it, salting before canning helps, but my secret is salting and using Ball Pickle Crisp*.

Cold pack pickles, such as Claussen, are put raw into cold sterilized jars, which are then filled with cold brine and the jars are refrigerated.  After a month or so you have great pickles.  The only problem is storage space.  I don't have room in my refrigerator for more than 2 jars of pickles.   My garden produces way more than 2 jars worth of cucumbers.  To keep jars of pickles safely at room temperature requires processing the jars in boiling water long enough to kill any bacteria and using a brine that has the proper pH.  Don't worry, you don't need a food chemistry degree.  You just need a recipe from a reliable source. 

Here's my favorite Garlic Dill recipe.  This recipe makes 2 quarts or 4 pints.  It's adapted** from The Complete Book of Year Round Small-Batch PreservingSmall-batch is important to me, because my cucumbers ripen in small harvests.  The best pickles are made from fresh cucumbers.  They're harvested and kept refrigerated until I'm ready to can, usually the next day.  I've adapted the recipe in that I salt the cucumbers overnight, and use dried dill weed instead of dill seed.  I also added Ball Pickle Crisp.

3 lbs. small pickling cucumbers, scrubbed in cold water
2 tablespoons pickling salt

Brine:
2 cups white vinegar
2 cups water
2 additional tablespoons pickling salt

To add to jars:
4 teaspoons dried dill - Quarts: 2 teaspoons per jar, Pints: 1 teaspoon per jar
6 cloves garlic, peeled
Ball Pickle Crisp - Quarts: 1/4 rounded teaspoon per jar, Pints: 1/8 rounded teaspoon per jar

Cut 1/4" slice from both ends of cucumbers and discard.  The ends of cucumbers contain enzymes that can result in soft pickles. Cut each cucumber into 6 or 8 spears and place in a non-reactive container large enough to hold them all.  Add 2 tablespoons pickling salt and toss to coat.  Cover and allow to sit at least 3 hours and up to overnight in a cool place.  They don't have to be refrigerated, I place it in my cool basement.


Last night that container was full of sliced cucumbers and 2 tablespoons canning salt - no liquid.  The salt has drawn off all that extra juice.  Getting rid of the juice will help make the pickles crisp.  The pickles are drained and rinsed in cold water three times, then allowed to drain in a colander while I wash the jars and heat them in the canner.

The Ingredients
Having everything set out and ready to go makes for a stressless canning session. Fill the canner (or large tall stockpot) with cold tap water, add a rack to lift the jars off the bottom of the pot and begin heating. Wash 2 quart plus 1 pint or 5 pint jars in hot soapy water, rinse well and place upright into canner, allowing them to fill with water. (I always prepare 1 jar more than I think I'll need, just in case). When it's simmering, make the brine.  Combine brine ingredients in a small, non-reactive saucepan and bring to a boil. Once the jars are all full, you'll know how many lids to heat.  Heated lids can not be reused.

When the brine boils and the jars are simmering it's time to get started.  Take one jar at a time out of the canner and drain its water into a small pot.  You'll use it to heat your lids but won't need a fire under this pot.  The hot water softens the sealing compound on the jar lid so it will readily adhere to the jar.

Place the hot jar on its side on a towel lined countertop.  It's easier to fill the jar if it's laying down. Put the cucumber spears one at a time into the jar. When it's hard to slide more in, turn it upright and pack in more spears in between the ones already in the jar.  You want them to fit very tightly.  Add garlic, dill and Pickle Crisp and ladle in the boiling hot brine.  Use a long, thin, non-mettalic object (a spatula handle or chopstick works well) to 'bubble' the jars.  Wiggle it between the cucumbers and the inside of the jar to coax any air bubbles to the surface.  Top off the jars with additional brine to within 1/2" of the top of the jar.  Wipe the jar rim and rings with a damp paper towel to clean off any brine or seasonings.  Carefully add the lids, avoiding touching the inside of the lids and jar rims.  Add the rings and screw on until you just meet resistance.  Screwing it too tight will prevent the air from escaping, which it must do to form a vacuum. Other, more dire consequences are possible - see my Blowout post.

Have the water at a full boil and carefully lower the jars into the canner.  The water should be at least 1" above the top of the jars.  If necessary, add some of the hot water in the small pot back.  You'll see bubbles coming out of the jars - that's good. Begin timing when the water boils again. 

Ready for their nap.
When the processing time is finished, carefully remove the jars and place on a heat proof surface lined with a kitchen towel. Cover completely, top and all sides, with another towel. You want them to cool slowly. You'll hear the jars 'ping' as they cool, that tells you the jars have sealed.  Don't move the jars until they are completely cool - at least 12 hours.  Then test for seal by pressing gently on the top of the lid. If it moves, the seal failed; place the jar in the refrigerator and use like an opened jar. Don't forget to label the jars with contents and date.

My friends Penny and Leah wanted to learn how to can tomatoes.  We had a lot of fun!

*Ball Pickle Crisp makes pickles crisp without changing the pH of the recipe.
**You can safely add, change quantities or delete spices.  Do not change the quantities of salt, sugar, water and vinegar. 


Wednesday, August 18, 2010

BACON!

BLT and Quick BBQ Beans
If it's summer, I have to make BLTs at least once a week.  Home grown tomatoes and bacon are the BEST flavor combination, but put it on homemade bread - yeah baby! 

But, here's the problem with bacon: cooking it.  I've tried cooking bacon so many different ways; each has it's own drawbacks.  Cook it in a skillet and some parts are overcooked and hard and other parts are flabby.  Microwave it and the slices stick to the paper towel.  Roast it and the outer slices overcook and the ones in the center of the rack are nearly raw. 

Well, I've found the perfect way to cook bacon.  Place your unopened package of bacon in the sink and run warm water over it.  Let it sit in the warm water for 5 minutes or so while you get out your pan and oil. Starting with everything at room temperature is the key to perfectly cooked bacon. Take a deep wide pan, like a dutch oven.  Put it on the stove, but don't turn on the stove yet.  Add 1/4 cup canola oil and the room temperature bacon.  Just open the package and slide the whole slab into the pan.  Now turn on the stove to medium low and begin separating the slices from each other and push them into the oil.  Let it cook low and slow.  First the brine will come out of the bacon and it will look pretty gross.  Let it cook, stirring it occasionally (yes, stir it).  Turn the heat down if it starts to spit.  After a few minutes, the brine will evaporate and the bacon will begin to sizzle.  It will look like a tangled mess.  Using tongs, turn the bacon every now and then.  It will begin to straighten out.  Slice your tomatoes and toast your bread.  When each bacon slice reaches the brownness you like, remove it to a paper towel lined plate.  Soon you will have a platter of bacon that is perfectly browned and crisp.  No hard burnt spots.  No white flabby spots.  Enjoy. Enjoy. Enjoy.

We had BBQ Beans when we visited Andrea in Phoenix this spring.  This comes close.  They're even better the next day.

Quick BBQ Beans
Sweet Baby Ray's Sweet and Spicy Barbeque sauce is spicy.  If you prefer a mild sauce, try Sweet Baby Ray's Original.

1 tablespoon bacon drippings (or oil)
1/4 cup minced onion
1 can (14.5 ounces) pinto beans, rinsed and drained
1/2 cup Sweet Baby Ray's Sweet and Spicy barbeque sauce (or your favorite)
1/4 cup catsup
1/4 cup water
Saute onion in drippings until translucent.  Add remaining ingredients.  Heat through. 

Oat Bread
This is a moist, slightly chewy bread that is very filling.
1 1/2 cups lukewarm water
1/4 cup canola oil
1 teaspoon lemon juice
1/4 cup sugar
1 1/2 teaspoons salt
2 3/4 - 3 cups all-purpose flour
1 1/2 cups quick oats
2 1/2 teaspoons dry yeast

This makes a 2 pound loaf.  If your machine will not accomodate a 2 lb. loaf, use the dough cycle. When finished, place in 2 loaf pans and allow to rise 45 minutes, then bake in a 350F oven for 30 minutes.
 
Starting with 2 3/4 cups of flour, place ingredients in your bread maker in the order suggested by the manufacturer.  (I get the best results by putting all the liquids in first, then combining the dry ingredients with the yeast and adding it on top of the liquids).

Select the basic bread setting and medium crust color.  Check the dough after 5 minutes and add more flour or water if necessary.

Tuesday, August 17, 2010

Chicken Curry and a Blowout


Curried Chicken (click for link to recipe) is such a simple recipe.  The flavors are amazing.  You take some ordinary spices, toast them in some oil, add onion and let it cook until the onions are soft.  Then add chicken, tomatoes (used my last jar of tomatoes from last year), potatoes and cilantro.  Let it simmer for 30 - 40 minutes and stir in some sour cream and raisins.  Oh my goodness!  Rich, creamy, a little spicy and tender.  I put it on rice to get all that luscious sauce. 

The recipe is also forgiving.  Don't have chicken breasts? Use boneless thighs.  Cut the chicken into bite size pieces if you like. Leave the onion in slices or chop it tiny.  No fresh ginger? Use a teaspoon of dried ground ginger.  No cilantro?  Use parsley - dried will work too.


The Blowout

I don't know what happened.  When I lifted the jar at the end of the processing time, the bottom had blown off and the contents spewed.  This is the first time this has happened to me.  Either I screwed the ring on too tightly which didn't allow the air to vent, or the bottom of the jar had a flaw.  Normally, a too tight ring would cause the metal lid to flex up and out of the ring. Since the break is so cleanly around the bottom of the jar, I believe that the jar bottom had some defect I didn't detect when I examined them.  Or, maybe I knocked that jar when putting it in the canner.  The end result is one less jar of tomatoes and a large mess to clean up.

This is what makes it worthwhile:

Saturday, August 7, 2010

Canning - Bread N' Butter Pickles


When you have a garden like this, you have to be ready to make use of all God provides.  This summer He has provided lots of heat and rain, which resulted in baskets and baskets of tomatoes, zucchini, green beans, yellow squash and cucumbers.  No family, well other than the Duggers, could have used all my garden has produced this summer.  I don't have 19 kids, so I make pickles and relishes.   This week I made Zucchini Salsa, Lemon Cream (zucchini jam), and Bread N' Butter Pickles.

My love for kitchen gadgets is legendary in my family.  My husband firmly guides me past the doors of Williams Sonoma while half-jokingly telling me to "Resist!, Resist!"  Half-jokingly, because if left to my own desires, I'd be in there in a flash and stay for hours.  A few years ago, my heart was set on a mandolin.  I'd tell him earnestly about all the wonderful things I could make if I only had a mandolin.  I put it on my Christmas Wish List - and my darling husband gave it to me for Christmas, even though he couldn't understand why I would need such a thing.  I'm pretty good with a chef's knife.  These pickles are cut in perfect 3/8" slices - on my mandolin.

After the cucumbers are cut, the red peppers and onions are sliced by hand into 1/8" strips.  They all go into a very large bowl and are tossed with canning salt*, covered with a clean kitchen towel and allowed to rest at room temperature at least 3 hours.  The salt draws excess moisture out of the vegetables, which helps make them crispy in the end.  After the resting period, the vegetables are rinsed and drained several times.  Then allowed to drain very well.  I put the colander back into the large bowl and let them drip while I get my jars, brine and canner ready. 


Sugar, vinegar and spices are heated to a boil; the vegetables are added and it's brought back to a boil.

The hot vegetables are packed with a slotted spoon into hot jars, the brine is poured over and any air bubbles are removed by jiggling a non-mettalic spatula between the veggies and the sides of the jar.  Then the jar rims and threads are wiped clean, hot lids are placed, the rings are screwed on and the jars take a 10 minute boiling water bath.
When the timer goes off, the jars come out.


Aren't they beautiful?  Can't wait to open...
As you can see in the photo, my cookbooks have notations scribbled all over the pages.  As the years go by, I adjust the spices to suit my tastes.  However, it's important to never change the amounts of sugar, vinegar, salt or water in a canning recipe.  They are carefully balanced for food safety.

Here's my favorite Bread N' Butter Pickle recipe, adapted from Complete Book of Small-Batch Preserving:

4 lb. small pickling cucumbers (kirby)
2 onions, peeled, halved and cut into 1/8" half moons
2 sweet red peppers, cut in thin strips
2 tablespoons canning salt
_ _ _ _ _ _ _ _ _ _ _ _ _
4 cups cider vinegar
3 cups granulated sugar
1 tablespoon mustard seeds
1 tablespoon mixed pickling spices
1 teaspoon celery seeds
1/2 teaspoon turmeric
1/4 teaspoon ground cloves
_ _ _ _ _ _ _
Ball Pickle Crisp Granules

Scrub cucumbers well to remove grit and spines.  Cut a small slice off each end and discard them. (They contain enzymes that could cause the pickles to be soft). Cut cucumbers into 3/8" slices.  Place cucumbers, peppers and spices in a large non-reactive bowl and toss with canning salt.  Cover with a clean kitchen towel and allow to rest for at least 3 hours or overnight.

Drain the vegetables in a large colander and rinse well with several changes of cold tap water, drain and leave in colander.  Place colander with vegetables in a large bowl to catch dripping water.  Allow to drip, shaking occasionally, while preparing brine and jars.

Fill your canner 3/4 full with cold water.  Place the rack inside the canner.  Place the clean jars on the rack, allowing the water to fill the jars. Cover and heat to boiling.  When it boils, reduce heat to a simmer.  Keep jars in the simmering water until ready to fill.

Fill a small pot with cold water; heat to a simmer.  After you've filled your jars, you'll know how many lids to heat.  Place the lids into the simmering water to heat.

In a pot large enough to hold vegetables and brine, combine the vinegar, sugar and spices.  Heat to a boil.  Add the vegetables (discard the water in the bowl), press gently into the brine and return to a boil. Boil 30 to 60 minutes, or until the cucumber skins go from bright green to olive green.  Reduce to a simmer.

Remove jars from the canner.  Cover the canner and increase the heat to bring water back to a boil.

Using a slotted spoon and a canning funnel, fill the jars with the hot vegetables, jiggling the jars to distribute evenly and pressing down with the back of the spoon to pack the jars well.  Spoon Ball Pickle Crisp on top of veggies (quarts = 1/4 teaspoon per jar, pints = 1/8 teaspoon per jar).

Ladle hot brine over the vegetables, remove air bubbles and top off the brine if necessary to within 1/2" of the rim.

Wipe the jar rims and threads with a hot damp paper towel to clean off any drips.  Add hot lids and rings; screw on to just finger tight.

Carefully place jars back into the canner.  The boiling water should be at least 1" above the top of the jars.  If not, top off with water from the small pot.  The water will stop boiling while you are adding the jars.  Begin timing from the moment the water starts boiling again.  Quarts = 15 minutes, Pints = 10 minutes.

Cover a heat proof surface with a clean kitchen towel.  When the timer goes off, turn off the flame and carefully remove the jars from the canner.  Place close together, but not touching, on the towel.  Cover with several more towels and leave undisturbed at least 12 hours.

Within a few minutes, you will hear the most delightful 'pings'.  That is the sound of success, as your jars announce they are sealed.

After 12 hours, remove the towels and check each jar for seal by pressing gently down on the center of each lid.  It shouldn't move.  If it does, place it in the refrigerator and use within a month.

Don't forget to label your jars with contents and date. 

*It's important to use canning salt for several reasons. Mainly, salt is not just salt. Table salt has iodine and anti-caking agents added to it, which will make your brine cloudy and give a metallic taste to your pickles. Sea salt and kosher salt have different weights than canning salt, so you'll end up with too much or too little salt. Since salt is an important preservative, too little can mean your pickles go bad.